Running Your Own DNS Server in a Homelab - Architecture, Lessons, and My Setup
DNS is one of the most critical services on the internet, quietly hanging out in the background of nearly every transaction that takes place on the Internet and local area networks. Every website you visit, every API request, every SaaS application, and nearly every internal network service depends on DNS resolution.
When it works, everything feels instant and invisible. When it fails, the entire network appears broken, and everything turns into that “Human sacrifice, dogs and cats living together… mass hysteria!” line from Ghostbusters.
That’s why there’s a long-running joke in IT:
“It’s always DNS.”
The joke gets repeated whenever something strange happens on a network. Sometimes it’s accurate, sometimes it isn’t, but the fact that it exists at all says something important: DNS is foundational infrastructure.
Once you start running DNS yourself, the perspective changes. The joke stops being funny and starts becoming a reminder that a huge portion of the internet depends on a system most people barely understand.
Running DNS in a Homelab is one of the fastest ways to develop that understanding.
A Brief History of DNS
Before DNS existed, the early internet relied on a file called HOSTS.TXT.
This file contained hostname-to-IP mappings and was shared between systems. As more machines joined the network, keeping those files synchronized became impossible.
In 1983, DNS was introduced to solve the problem by creating a distributed hierarchical naming system. Instead of one shared file, DNS allowed organizations to manage their own domains while participating in a global resolution structure.
The system is still built on the same layered model today:
- Root servers
- Top-level domains
- Authoritative DNS servers
- Recursive resolvers
Despite the massive scale of the modern internet, the architecture has held up remarkably well.
My First Experience Running DNS
My first real exposure to DNS administration came early in my career working with BIND servers. This was before DNS was something most administrators thought about casually. Information lived in zone files and configuration files where a single typo could break resolution.
Later, when that environment transitioned from Windows NT4 to Windows Server 2003, the DNS infrastructure moved to Microsoft DNS running on domain controllers. The graphical management tools and Active Directory integration made things easier, but the underlying mechanics were still the same. DNS remained the backbone of the network.
That lesson became extremely clear during an incident early in my career.
A Real Example of What Happens When DNS Disappears
Understanding DNS, in concept, is one thing. Seeing what happens when it disappears is another. Early in my career I had a front-row seat to exactly that situation and it was one of the moments that influenced how I think about infrastructure.
The second CIO I reported to at my first IT job didn’t take technology particularly seriously. Everything felt like an experiment running directly in production. At one point he even installed KaZaa on a Microsoft Proxy server because he wanted to download Limp Bizkit albums. Predictably, that ended poorly.
The next morning the proxy server had been completely compromised. The hard drives were filled with pirated movies and software cracks, and the system had been turned into a torrent seed box. This has nothing to do with DNS; I’m just setting the stage for what it was like working with the guy.
About a year into the job, the first CIO had already prepared me to keep the infrastructure running after his departure. I could maintain the network, but I was still too junior to officially run things, and the new CIO decided the “old HP desktops pretending to be servers” needed to go.
Without asking questions, reviewing documentation, or even looking at the network diagram I had created, he simply powered them off. Those machines were Slackware systems running BIND and several other core services. Every system on the network depended on them
Within minutes the intercom started lighting up across the office because there was no Internet, no email, and nothing else on the network working. The fundraising system, accounting system, and everything else simply vanished from the organization’s point of view. In reality, DNS is what vanished and the reason why was painfully clear.
I looked him directly in the eye, slowly walked backward into the computer closet, crouched down, reached behind me, and turned both servers back on - without breaking eye contact. A few minutes later the network came back to life.
It was an unnecessary incident, entirely caused by someone responsible for infrastructure who had no interest in understanding it. As frustrating as it was, the incident was also clearest demonstration I’ve ever seen of how critical DNS is. When it disappears, an entire network appears to collapse.
Why Running DNS in a Homelab is Valuable
Stories like that are exactly why DNS is worth running in a Homelab. Operating your own DNS infrastructure teaches lessons that are difficult to learn any other way.
Running DNS locally allows you to control your environment in ways most consumer setups cannot. You gain the ability to:
- create internal domains
- manage local hostname resolution
- override DNS records for testing
- filter problematic domains
- improve reliability through redundancy
It also removes a dependency on whatever DNS configuration your router happens to be using.
The Learning Opportunity
Running DNS yourself forces you to understand how the system actually works. You begin to see the mechanics behind recursive resolution, authoritative zones, caching behavios, resolvers, and most importantly, when things go wrong.
These are concepts many administrators encounter in theory but rarely operate directly, and a Homelab DNS stack turns them into practical knowledge.
How I Run DNS in My Homelab
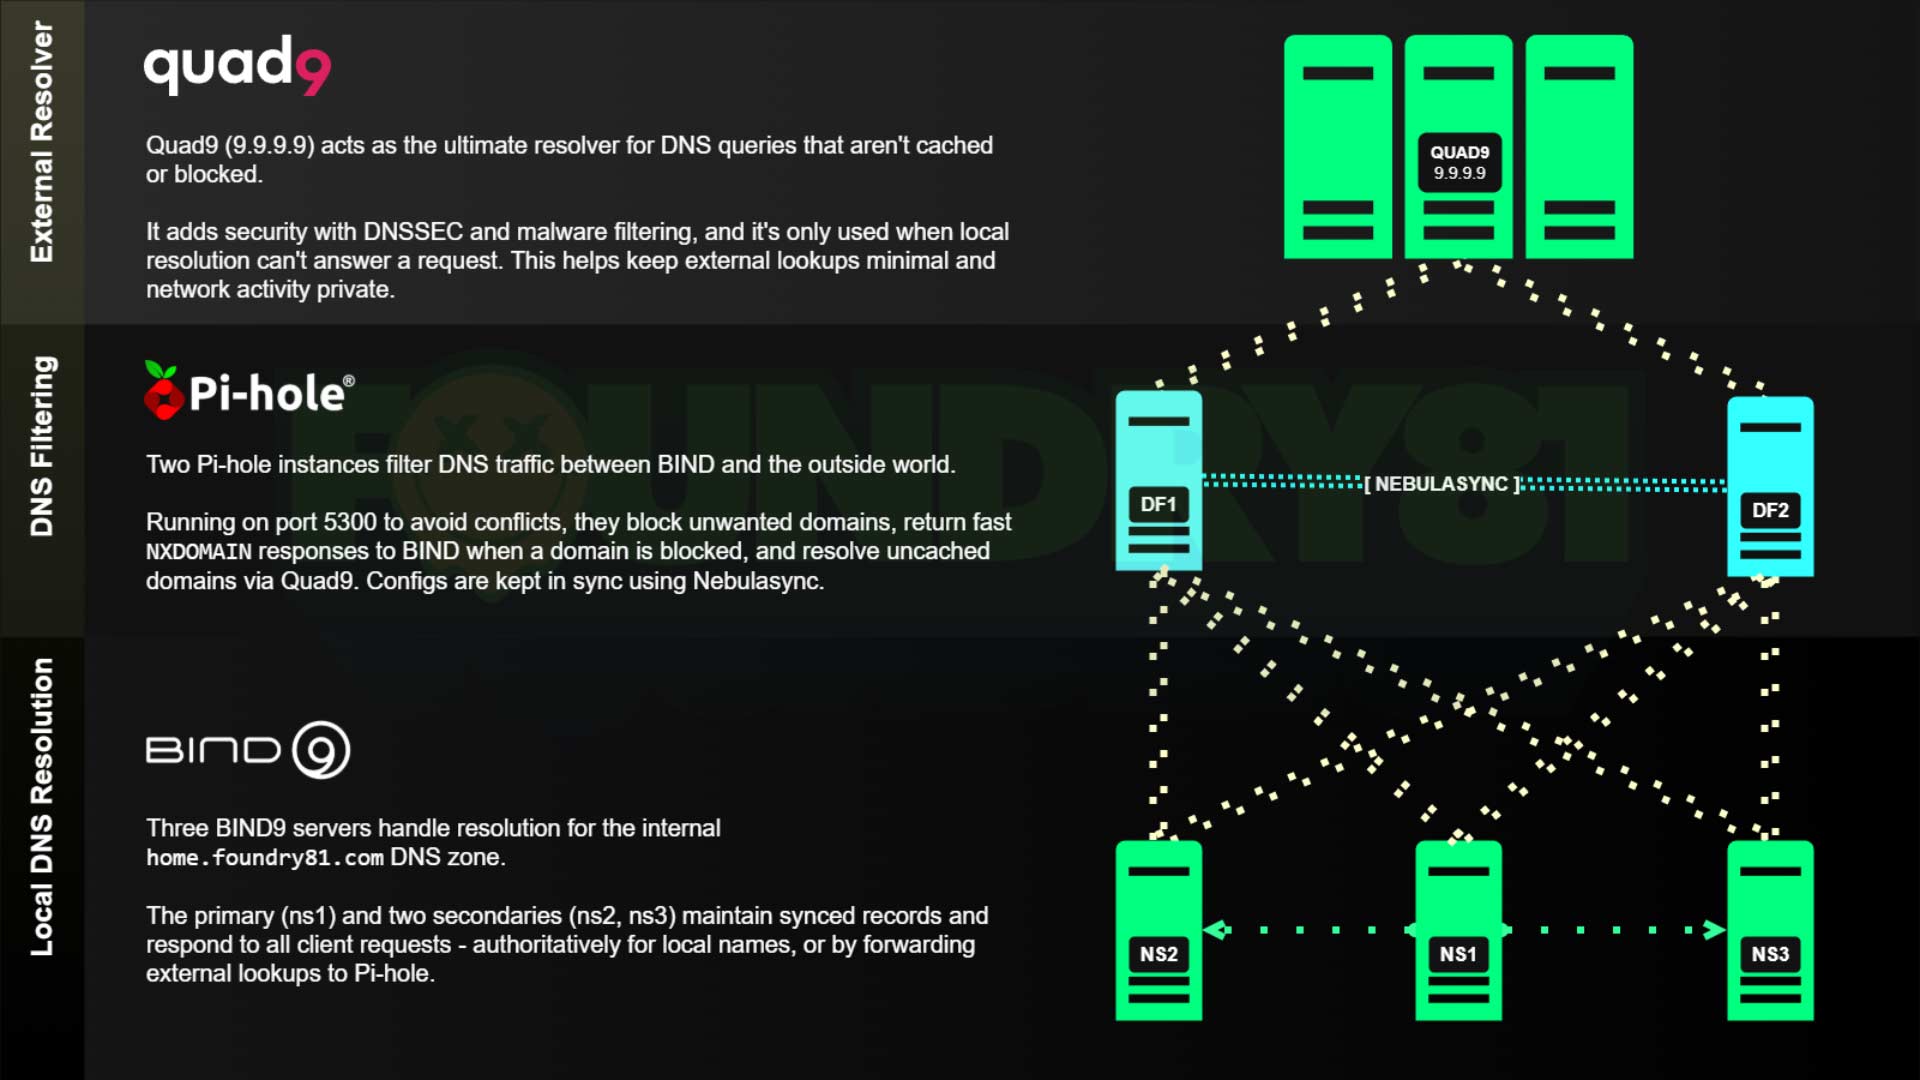
My DNS architecture uses a three-tier design, and each layer has a clear responsibility to make the system easier to reason about when troubleshooting.
All client devices on my network are restricted to using only my internal DNS servers. Direct external DNS access is blocked. The only systems allowed to perform external resolution are the Pi-hole instances, which forward queries to Quad9. This ensures that all DNS resolution flows through the infrastructure I control.
Tier 1 - BIND
The first layer consists of three BIND instances. These servers handle authoritative zones for internal domains, local hostname resolution, and forwarding external queries. Running multiple instances provides redundancy and ensures DNS remains available even if one node fails. These BIND servers forward external queries to the second tier. They are also the only DNS servers that clients on the network can access, keeping resolution consistent and preventing devices from bypassing the local DNS infrastructure.
Tier 2 - Pi-hole
The second layer consists of two Pi-hole instances.
These provide: DNS filtering, ad and tracker blocking, caching, and visibility into DNS activity. The instances are synchronized using Nebuasync, keeping configuration and block lists consistent across all nodes.
One design choice worth mentioning here is that Pi-hole only receives traffic from the BIND servers, not directly from individual client devices. That means I don’t get per-client reporting inside Pi-hole and that’s intentional.
I rarely look at per-client reporting, and that level of visibility isn’t something I need. What I care about is having a reliable filtering layer that keeps unwanted domains out of the DNS resolution path.
Running Pi-hole behind the BIND layer also keeps the BIND caches cleaner, since the filtering happens before responses reach the authoritative layer serving clients. For my use case, Pi-hole works best when treated as a filtering edge between my internal DNS infrastructure and the internet.
Tier 3 - Quad9
External resolution is handled by Quad9 (9.9.9.9).
The Pi-hole instances are the only systems allowed to reach this resolver. I chose Quad9 for a few reasons:
- strong privacy protections
- blocking of known malicious domains
- reliable global infrastructure
- consistently fast performance
This keeps the external portion of the DNS chain simple and trustworthy.
A lot of DNS setups in Homelabs grow organically and end up with clients pointing at a mix of local and external resolvers. That works - until it doesn’t. Restricting DNS flow and clearly separating roles between authoritative servers, filtering layers, and external resolvers makes the entire system easier to understand and troubleshoot. When DNS is easier to reason about, the rest of the network tends to behave better too.
Diagram of My DNS Architecture
Here’s a diagram of the full three-tier DNS architecture described above. It illustrates how:
- BIND handles local authoritative resolution
- Pi-hole provides filtering and caching
- Quad9 handles external resolution
This layered approach keeps the system reliable, transparent, and easy to troubleshoot.
Resources for Running BIND in a Homelab
If you’re interested in building a similar setup, I’ve published a few resources that make deploying BIND easier in containerized environments. These can be used as a starting point for building your own Homelab DNS stack.
This repository contains a several Docker Compose files for different BIND configurations – and accompanying configuration files: https://github.com/Foundry81/docker-bind-dns
The Docker image available here is the one I use in my Homelab. It’s Debian-based, minimal, and something I review/update on a quarterly(ish) basis: https://hub.docker.com/r/100781/bind-dns
Running DNS in a Homelab is Worth the Effort
Running DNS in a Homelab isn’t just about filtering ads or creating convenient internal hostnames. It’s about understanding one of the most fundamental systems on the internet.
Operating your own DNS stack teaches lessons that are difficult to learn from, and once you’ve operated DNS infrastructure yourself, troubleshooting network problems becomes much easier. You start to recognize patterns in how failures present themselves.
Sometimes the joke is wrong and sometimes it really is DNS. Running your own infrastructure helps you know the difference.
Further Reading
 The Self-Hosting Responsibility Spectrum
 n8n Zoom Transcript Analysis Workflow (and Download)
 Homelabs, self-hosting, and doing whatever the fsck you want.
Getting in Touch
Have a question? Want to talk tech? Curious about something you saw here?
Reach out. I’m always up for a good conversation, answering a thoughtful question, or geeking out over infrastructure, design, or the overlap between them. I’ll get back to you when I can.
Looking to build something? Launch something? Fix something?
If you see alignment between your work and mine, let’s explore it. I collaborate with IT organizations, creative teams, and builders who value thoughtful execution and clear outcomes. If it’s a good fit, we’ll make it happen.