At some point, every Homelab runs into “IP address fatigue.” You start with a couple of services, and your bookmarks suddenly become a chaotic mess of IP addresses and ports that correspond to each service running.
It works - but it’s not how the modern Internet operates. In a professional environment, you don’t navigate to an IP; you navigate to a domain. Moving from an IP like 192.168.1.10:3000 to something like https://dashboard.yourdomain.com involves more than a DNS record - it requires DNS and HTTPS working together.
In this post, we’re going to dive into how both work together to give your Homelab a professional, secure, and scalable infrastructure.
Why DNS Matters for HTTPS
HTTPS depends on DNS. To see why, you need to understand what a TLS certificate actually does. At its simplest, a certificate is a digital “ID card.” When your browser connects to a site via HTTPS, it asks the server for this ID which provides two things:
Encryption: The traffic between the client and server is encrypted.
Identity: Confirmation the server is actually who it claims to be.
Here’s the constraint: a Certificate Authority (CA) won’t issue a certificate unless you prove you control the domain. You need to first prove that you actually own the domain you’re claiming to represent.
That proof usually happens through DNS. To get a valid certificate for service.mydomain.com, you must prove to the CA that you have control over the DNS records for mydomain.com. Without DNS in place, you’re limited to self-signed certificates, which lead to the dreaded “Your connection is not private” warning.
Validation Methods: How the CA Knows You Own the Domain
When you request a certificate, the CA issues a challenge to verify ownership. There are two primary ways to prove ownership – HTTP-01 and DNS-01.
HTTP-01 Validation
This challenge is the most common method for public websites. The CA tells your server “Put this specific secret token at this specific URL” and then attempts to reach that URL over the public internet via port 80. If they find the token, they know you control the server associated with that domain.
HTTP-01 is common for public websites, but it breaks down in Homelabs. For most setups, exposing port 80 is a non-starter – plus you can’t use it for internal-only services that aren’t exposed to the web.
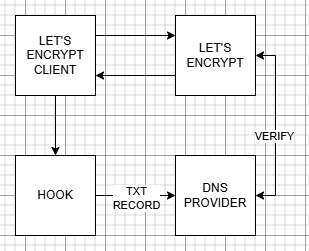
DNS-01 Validation
The DNS-01 challenge is the “gold standard” for Homelabs. Instead of a file, the CA asks you to create a specific TXT record in your public DNS zone. The CA checks the public DNS records and if the token is there, the certificate is issued.
Because this happens entirely at the DNS level, no inbound ports need to be opened. Your services can remain completely private and internal while still using a globally-trusted HTTPS certificate. This is typically automated through DNS provider APIs (Cloudflare, DigitalOcean, Google, etc.)
Wildcard Certificates: The “One Ring” of SSL
As your Homelab grows, you’ll need certificates for more and more subdomains – and this is where the wildcard certificate becomes valuable.
A wildcard certificate is issued for *.yourdomain.com. The asterisk acts as a wildcard - one certificate covers every subdomain.
Wildcard certificates require DNS-01 validation. A wildcard covers the entire domain, so CAs need a higher level of proof that only a DNS TXT record can provide. Once you have a wildcard certificate, adding new HTTPS services becomes trivial.
Using NGINX Proxy Manager
Now that we have the certificates, how can we actually use them? Managing certificates per container or VM doesn’t scale.
If you’re coming from experience hosting websites, and using caching tools like Varnish, NGINX is probably the first thing that comes to mind – and NGINX Proxy Manager makes using NGINX as a reverse proxy simple. It provides a clean GUI for managing reverse proxying and includes HTTPS support.
It can also handle certificate requests and DNS-01 validation automatically (with supported providers).
How it Works
The Request: A user types https://service.mydomain.com into their browser.
DNS: DNS resolves the domain to your reverse proxy.
The Proxy: The proxy matches the request to a configured service.
The Handshake: The proxy presents a valid certificate, completing the TLS handshake.
The Forward: The proxy forwards the request to the internal service.
DNS answers “where,” TLS answers “who,” and the proxy handles “how.”
By using NPM, the “encryption” happens at the edge (the proxy,) and your internal services don’t even need to handle HTTPS themselves – they can remain as simple HTTP traffic within your secure internal network. As an extra step, you can restrict access to the HTTP traffic to only the proxy server, if you’d like.
Using Let’s Encrypt for Internal Trusted Certs
For years, Homelabbers used “self-signed certificates” – certs you generate yourself. While the provide encryption, they lack identity verification and this is why your browser screams at you when using them.
Let’s Encrypt changed things. It’s a free, automated, and open Certificate Authority. By using the ACME protocol, your Homelab (via NPM or a tool like Certbot) can automatically request, renew, and deploy certificates.
Combined with DNS-01 validation, Let’s Encrypt enables trusted certificates for internal services. Your browser sees a certificate signed by a globally-recognized authority, so the lock icon turns green and the warnings vanish – even though the service is only available from inside your home network.
A Professional-Grade Environment
Once DNS and HTTPS are integrated, the experience changes immediately. No warnings. No exceptions. Just clean, trusted connections.
If you’re using your Homelab to learn for a career in IT, this mirrors how production environments are built. You’re practicing real-world DNS management, TLS termination, and proxying. The process we just detailed isn’t far off from the performance hosting solutions I used to build for the publishing industry – it’s just way more automated then it was back then.
Best of all, you gain simplified access. Instead of remembering a list of IP addresses and ports, you simply remember your domain. Setting up DNS and HTTP is often a checkpoint in a Homelab environment. It’s where you go from simply running some apps to architecting a network.
With DNS-01 validation, wildcard certificates, and a reverse proxy in place, your setup becomes:
- Complete: handles identity, encryption, and routing
- Structured: clear path from request to service
- Scalable: new services take minutes, not hours
At this point, you have everything needed to design HTTPS-based solutions for your Homelab using your DNS setup.

Access Your Homelab from Anywhere.
DNS gets you to the service, and HTTPS proves what you’re talking to. Once you move beyond your local network, both need to work together cleanly.
Platforms like Twingate rely on that combination - take a look at how that works without exposing your self-hosted services to the public Internet.
 Homelab DNS: Running BIND with Docker
 DNS in the Homelab
 Designing Your Homelab DNS